Test Adobe cursor jumping on tables
Segment 1: Intelligent Asset Management Foundation
Duration: 25 minutes
This segment explores how AEM Assets combines folder organization, AI-powered metadata generation, and Workfront workflow metadata to create a searchable, governed asset repository. You will experience AI search capabilities including natural language queries, semantic search, and contextual search, and learn how to prepare assets for distribution.
Exercise 1.1: Asset Organization and Folder Hierarchy
Duration: 4 minutes
Understanding Folder Structure in AEM Assets
AEM Assets uses a structured folder hierarchy that mirrors your organizational needs, whether by brand, campaign, region, or asset type. This structure provides governance and permissions while AI makes everything searchable regardless of where assets reside. The folder hierarchy enables role-based access control and creates a foundation for both manual browsing and AI-powered discovery.
Value for Your Organization:
- Folder hierarchy enables role-based access control across teams
- Consistent structure across campaigns simplifies navigation for all users
- Supports compliance requirements with clear asset ownership
Reference Data: Folder Structure
Level | Example Path | Purpose |
|---|---|---|
Brand | /content/dam/sevoi | Brand-level asset repository |
Campaign | /content/dam/sevoi/campaigns/escape-beyond-ordinary | Campaign-specific assets |
Region | /content/dam/sevoi/campaigns/escape-beyond-ordinary/apac | Regional variations |
Asset Type | /content/dam/sevoi/campaigns/escape-beyond-ordinary/apac/photography | Content categorization |
Step-by-Step Instructions
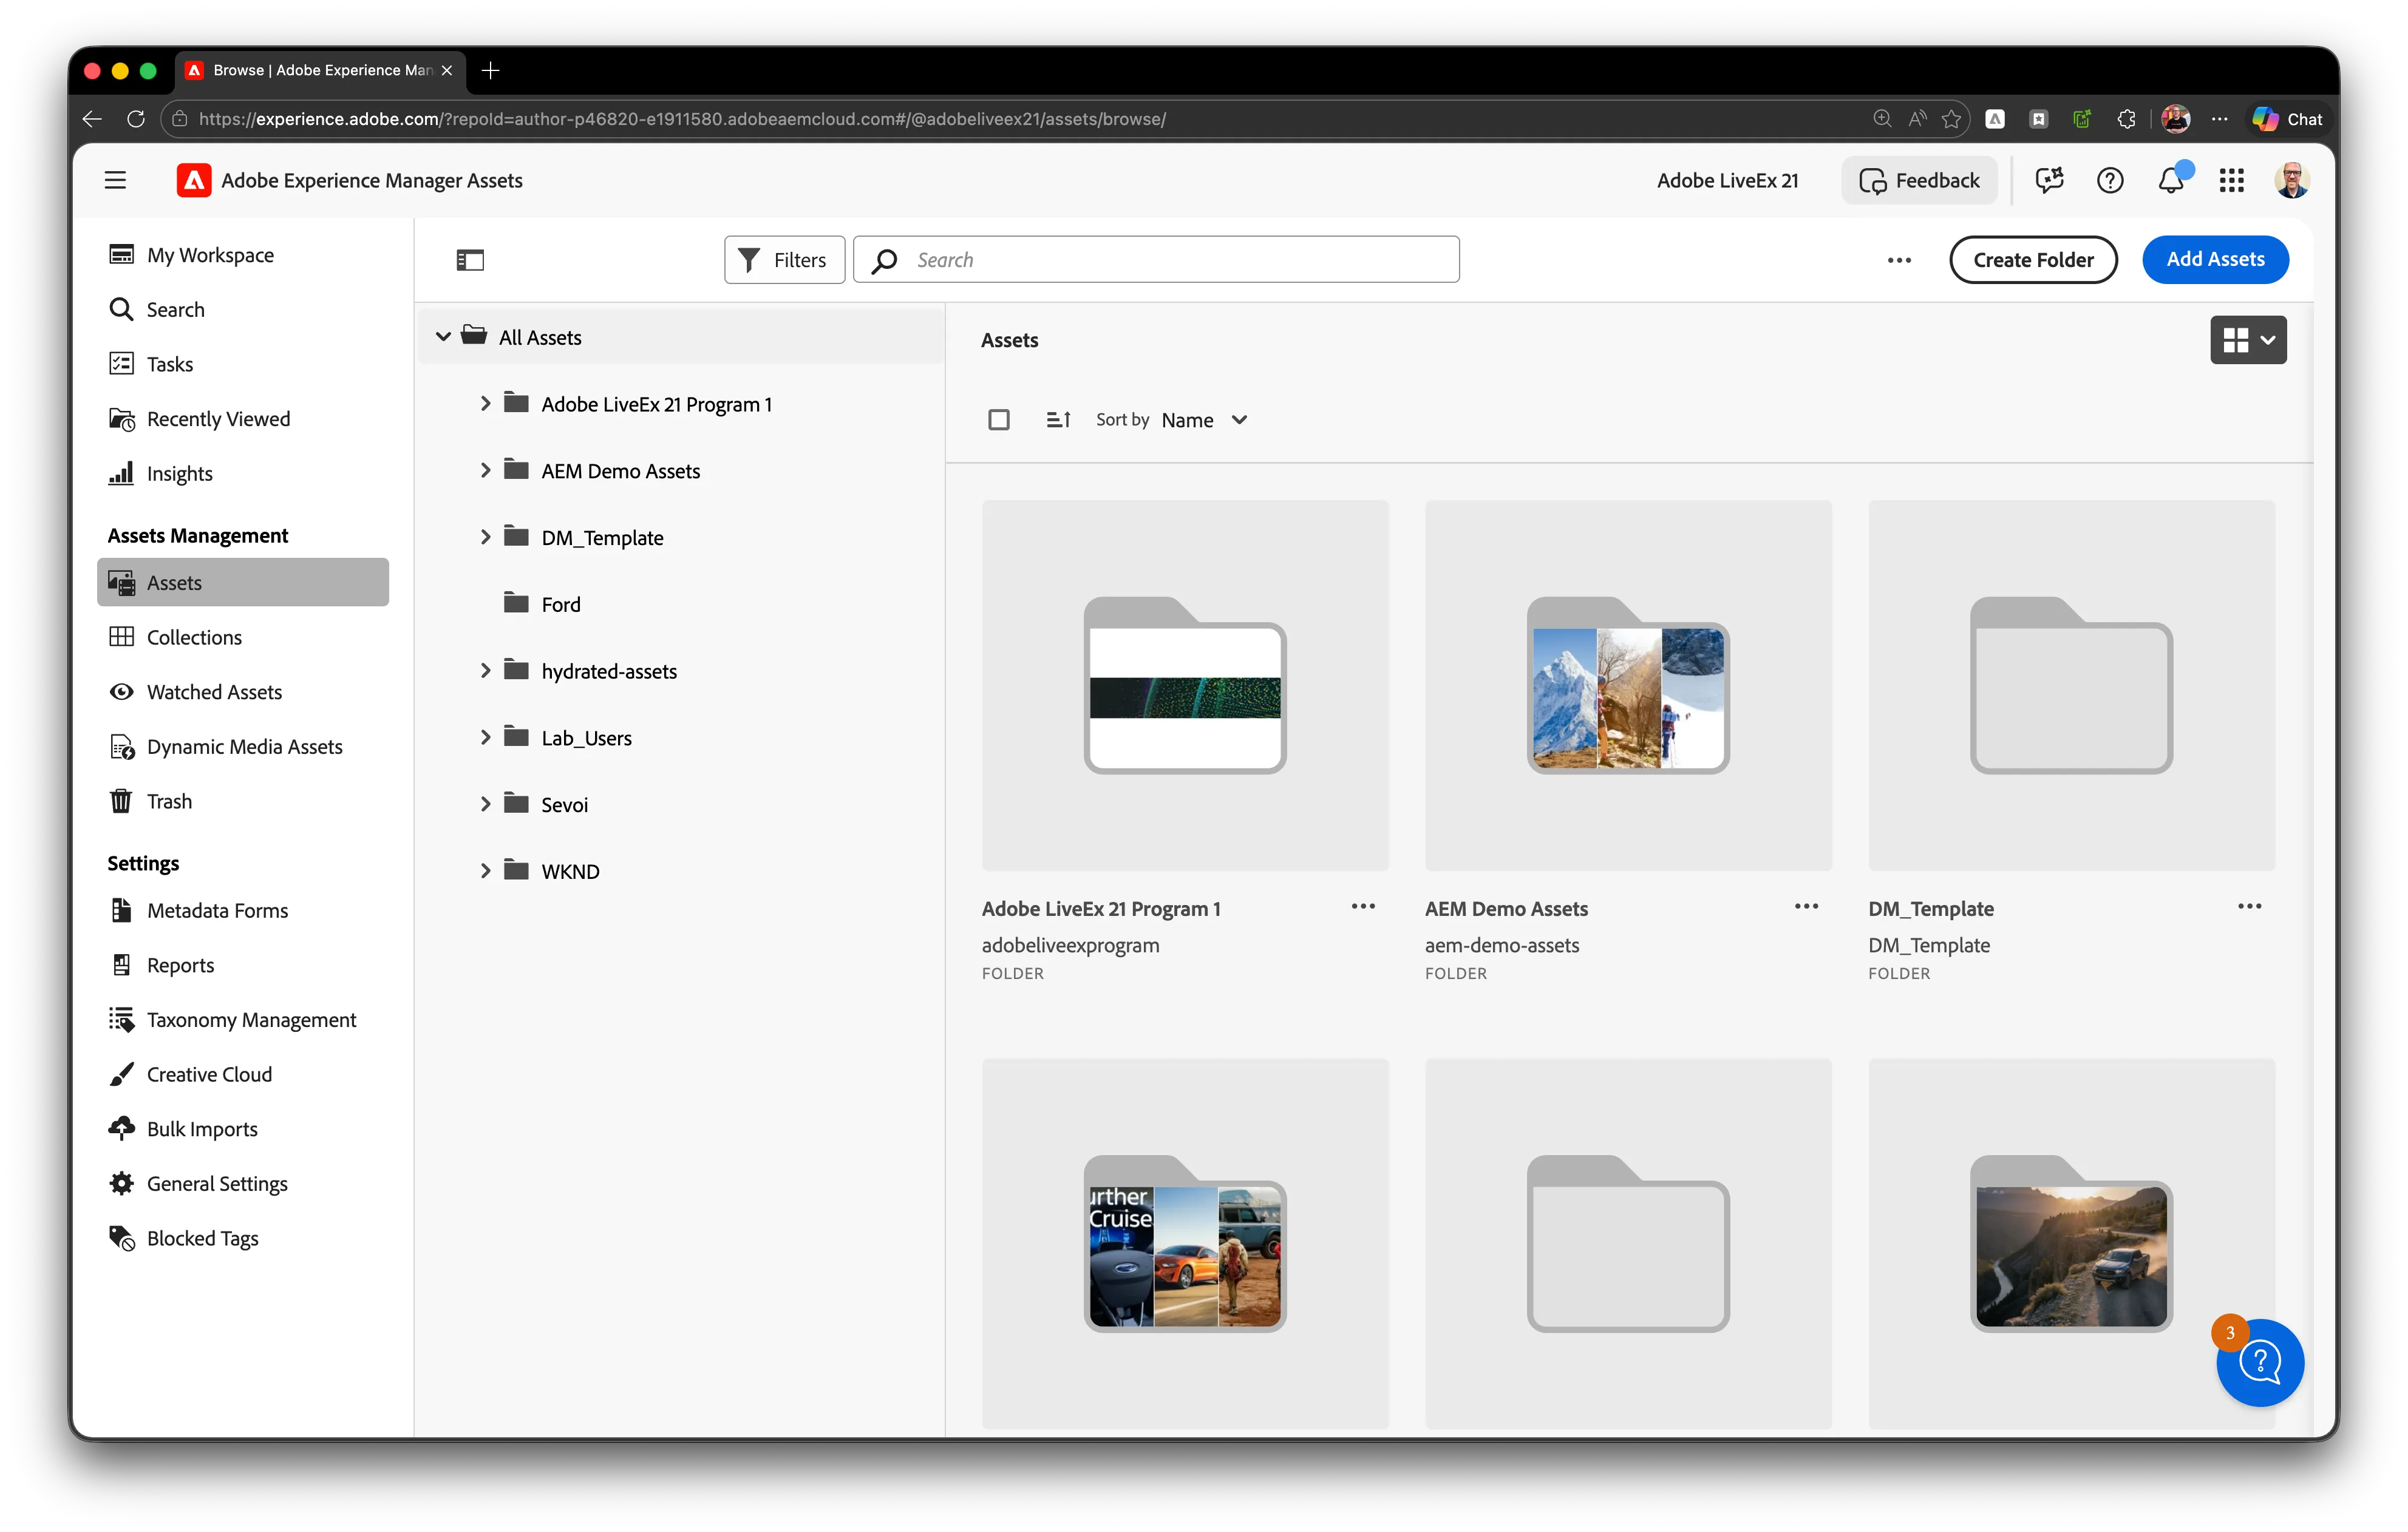
Step 1: Open AEM Assets
- Log into your AEM as a Cloud Service environment
- Navigate to the Assets view using the left navigation
- The Assets view provides a streamlined, marketing-focused interface
Step 2: Navigate to the Sevoi Resorts brand folder
- In the Assets view, locate the content/dam folder structure
- Click on the Sevoi brand folder
- This is the brand-level repository for all Sevoi Resorts assets
Step 3: Expand the campaigns folder
- Click into the campaigns folder
- Locate the "escape-beyond-ordinary" campaign folder
- Click to open this campaign's asset repository
Step 4: Review the folder structure
- Observe the regional folders: APAC, EMEA, Americas, LATAM
- Note how each region has consistent subfolders
- This structure supports governance while enabling regional autonomy
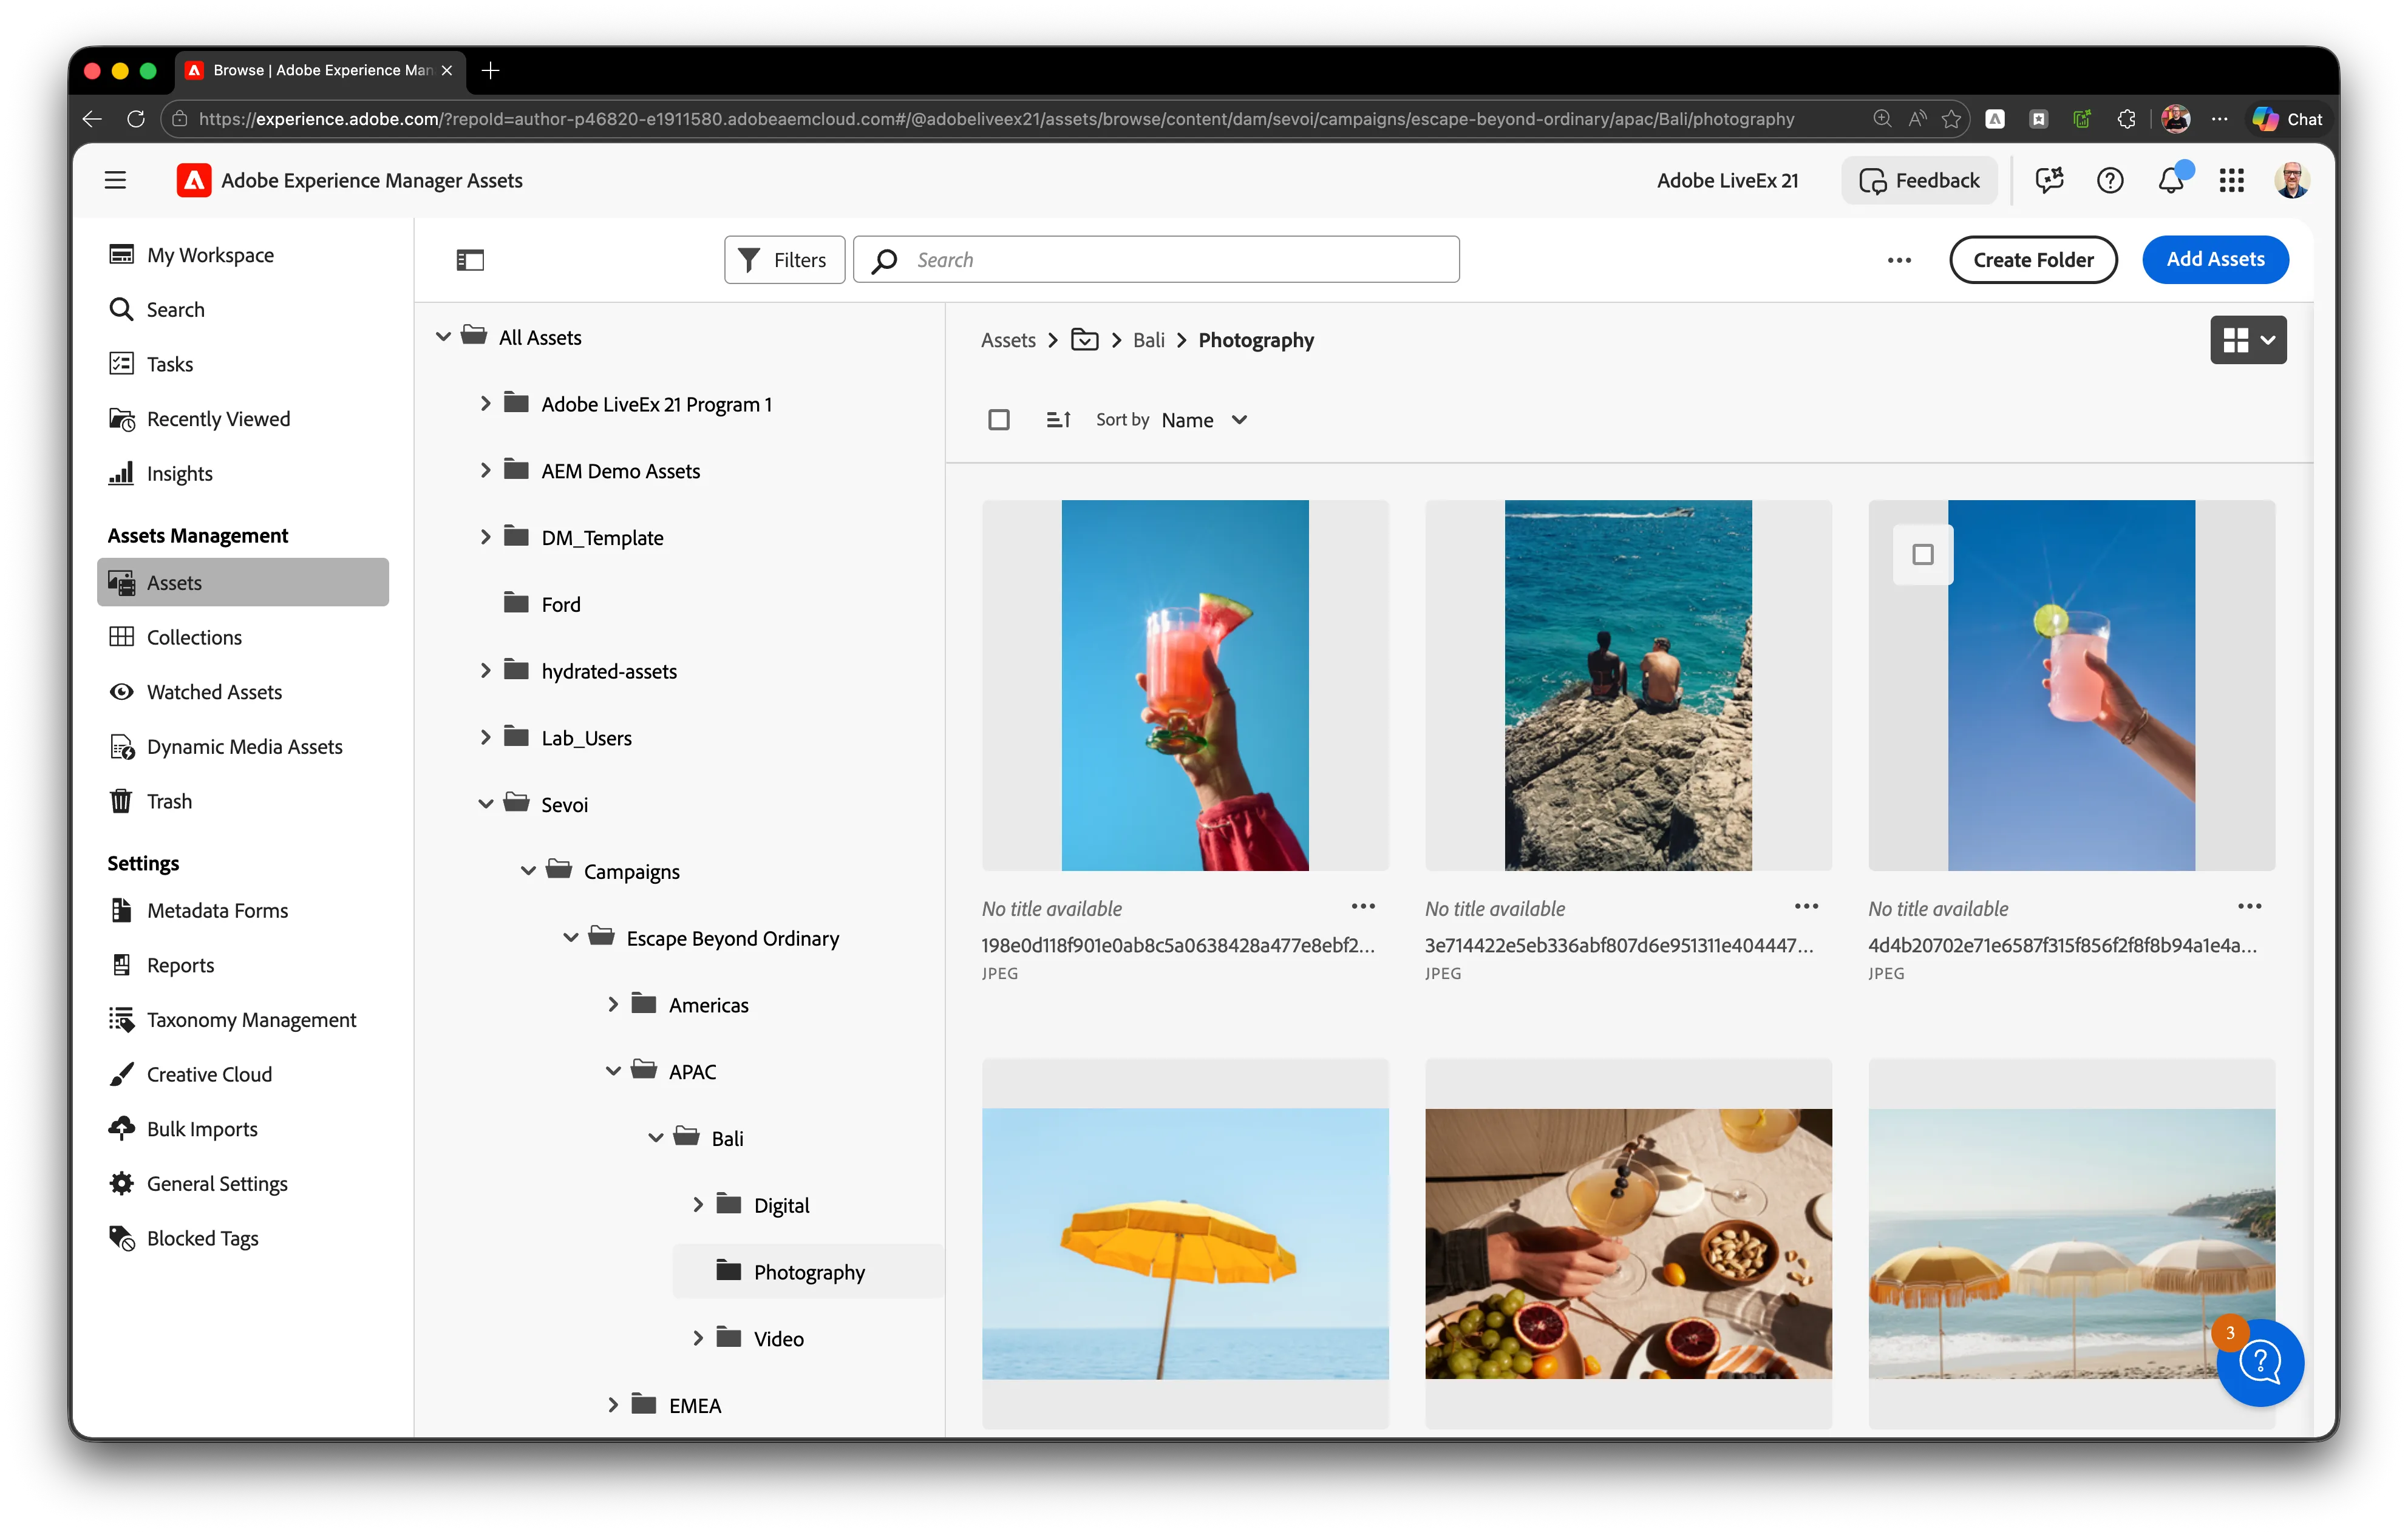
Step 5: Navigate to the APAC region folder
- Click on the APAC folder
- This contains assets targeted for the Asia-Pacific region
- Regional teams have appropriate access to their designated folders
Step 6: Observe the asset type subfolders
- Note the photography and banners subfolders
- This categorization helps teams find specific asset types quickly
Exercise 1.2: AI-Generated Metadata and Smart Crops
Duration: 6 minutes
Understanding AI-Powered Asset Intelligence
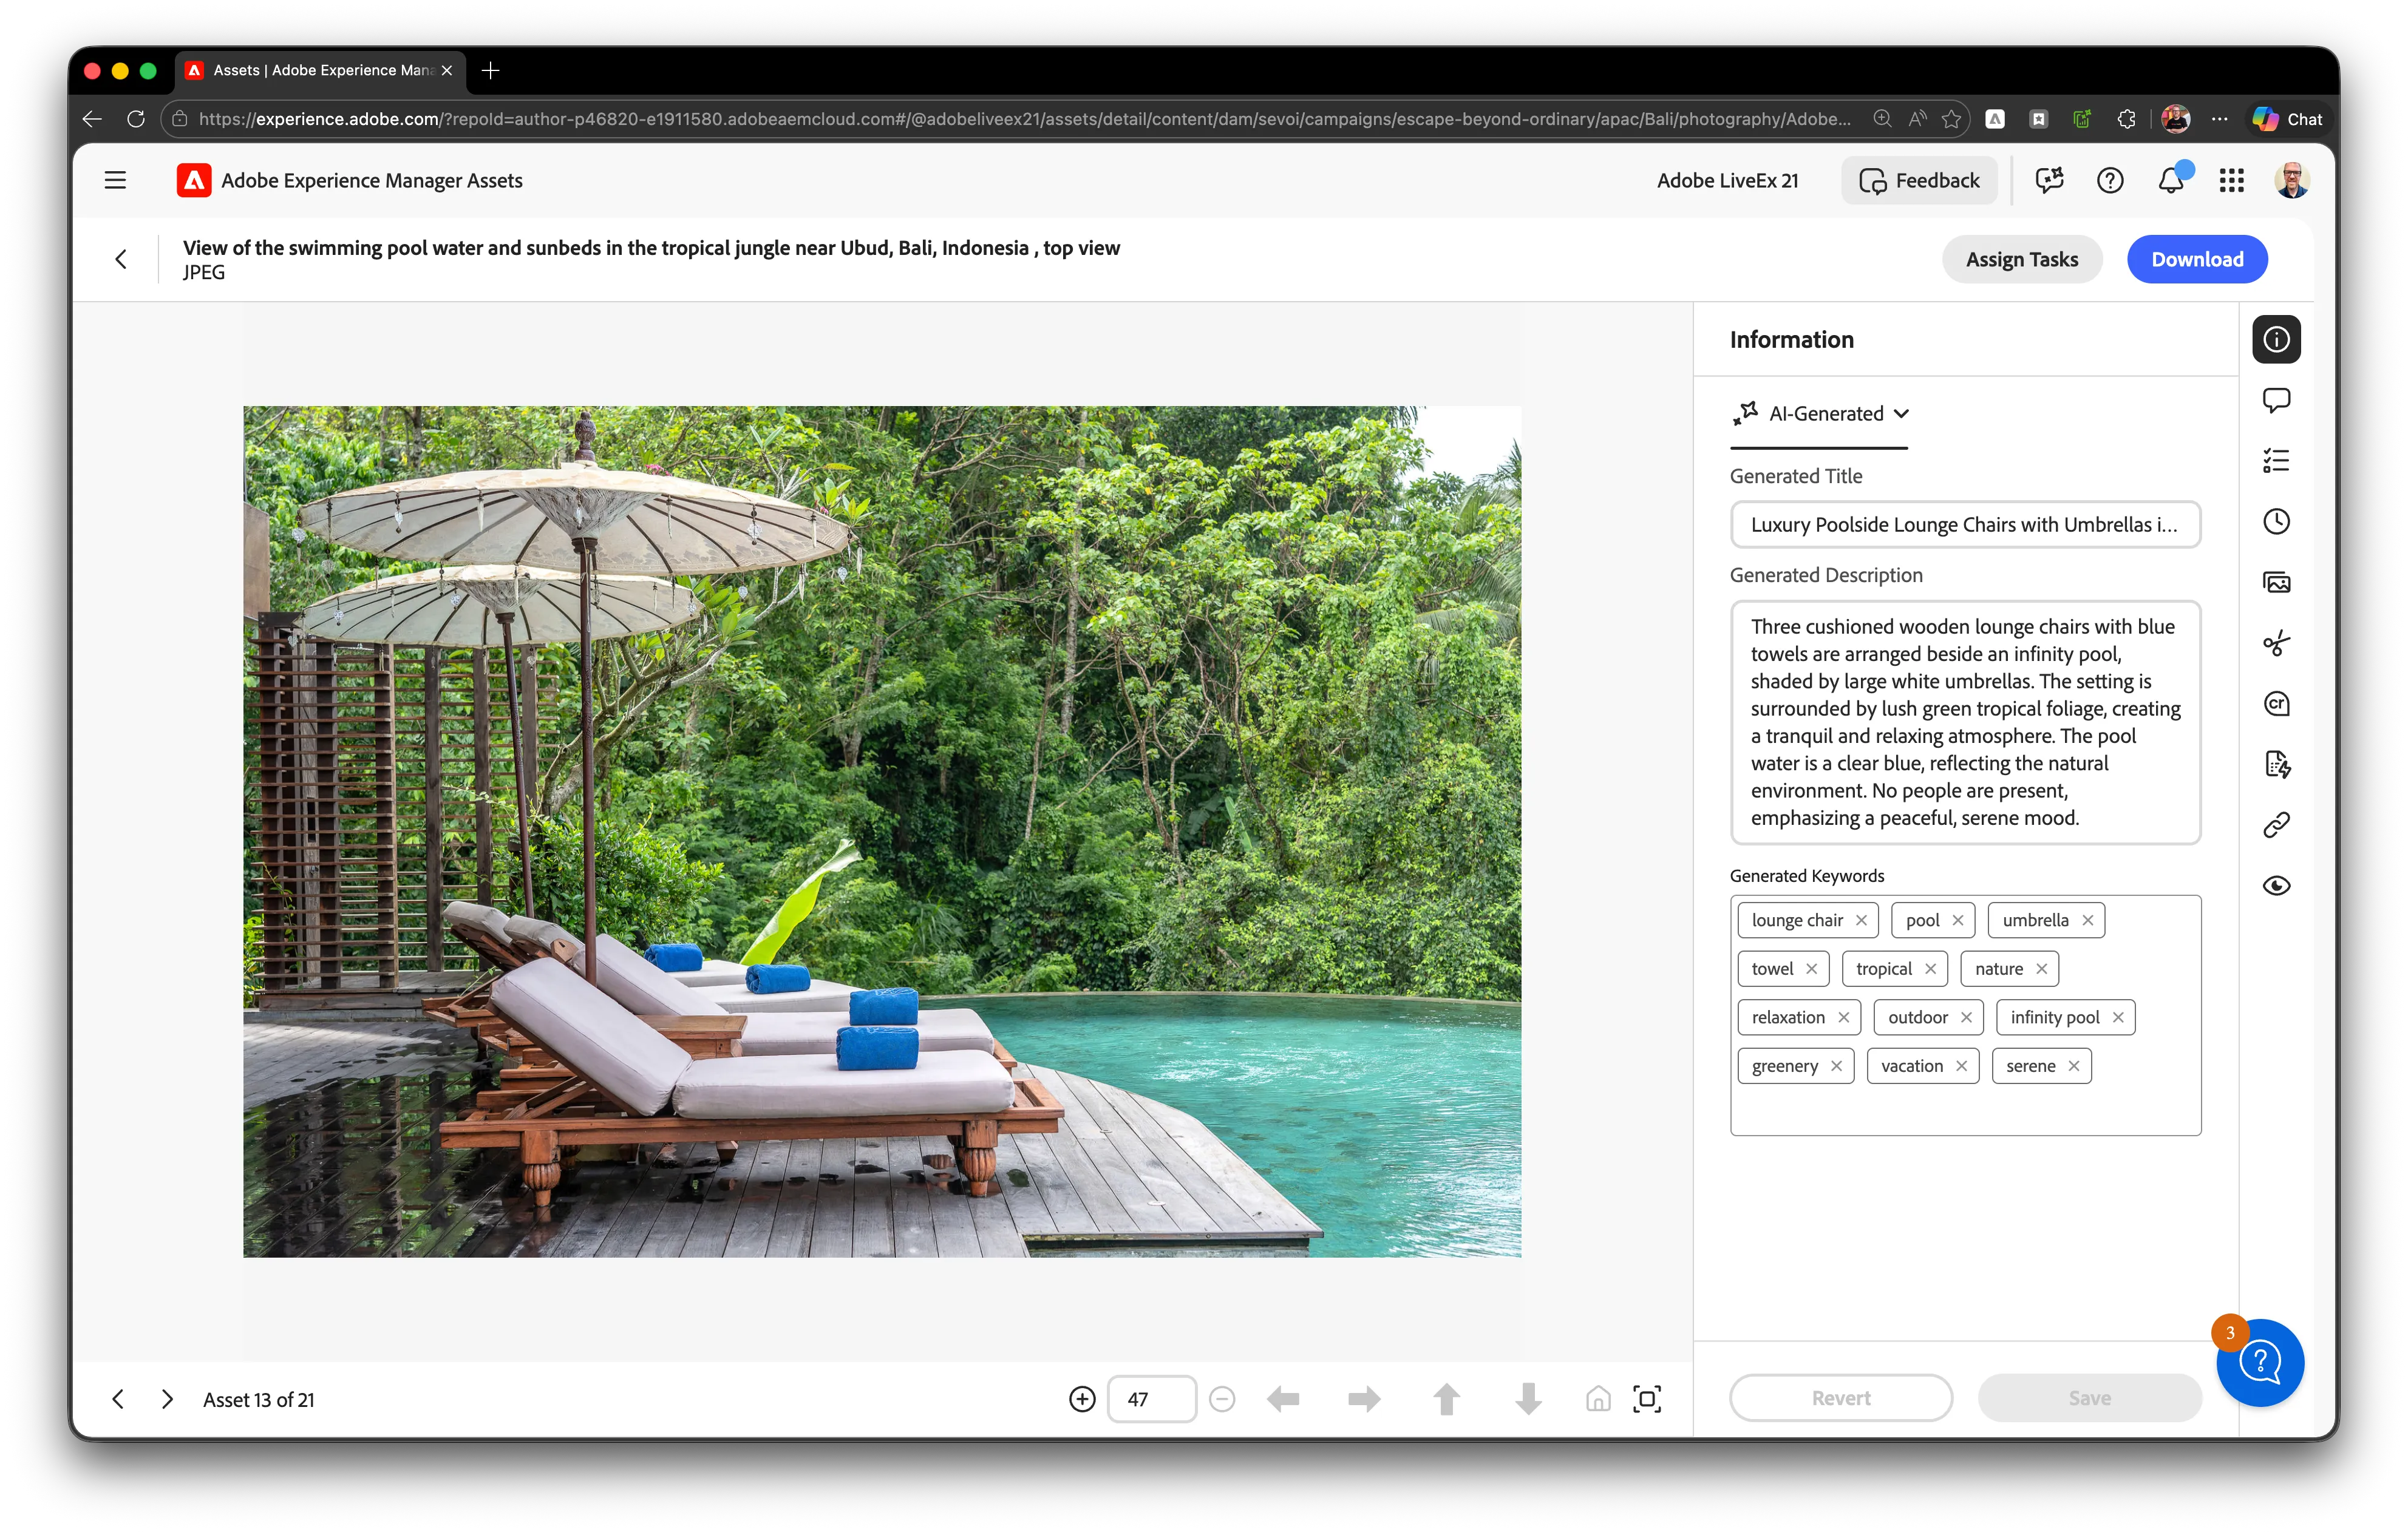
When assets arrive in AEM Assets as a Cloud Service, Adobe AI immediately goes to work. It generates three distinct metadata fields automatically including a Generated Title, a Generated Description, and Generated Keywords which appear in a dedicated AI Generated tab on the asset's Properties page. These are separate from any manually entered metadata; if no manual title is defined, AEM uses the AI-generated title by default across card and list views.
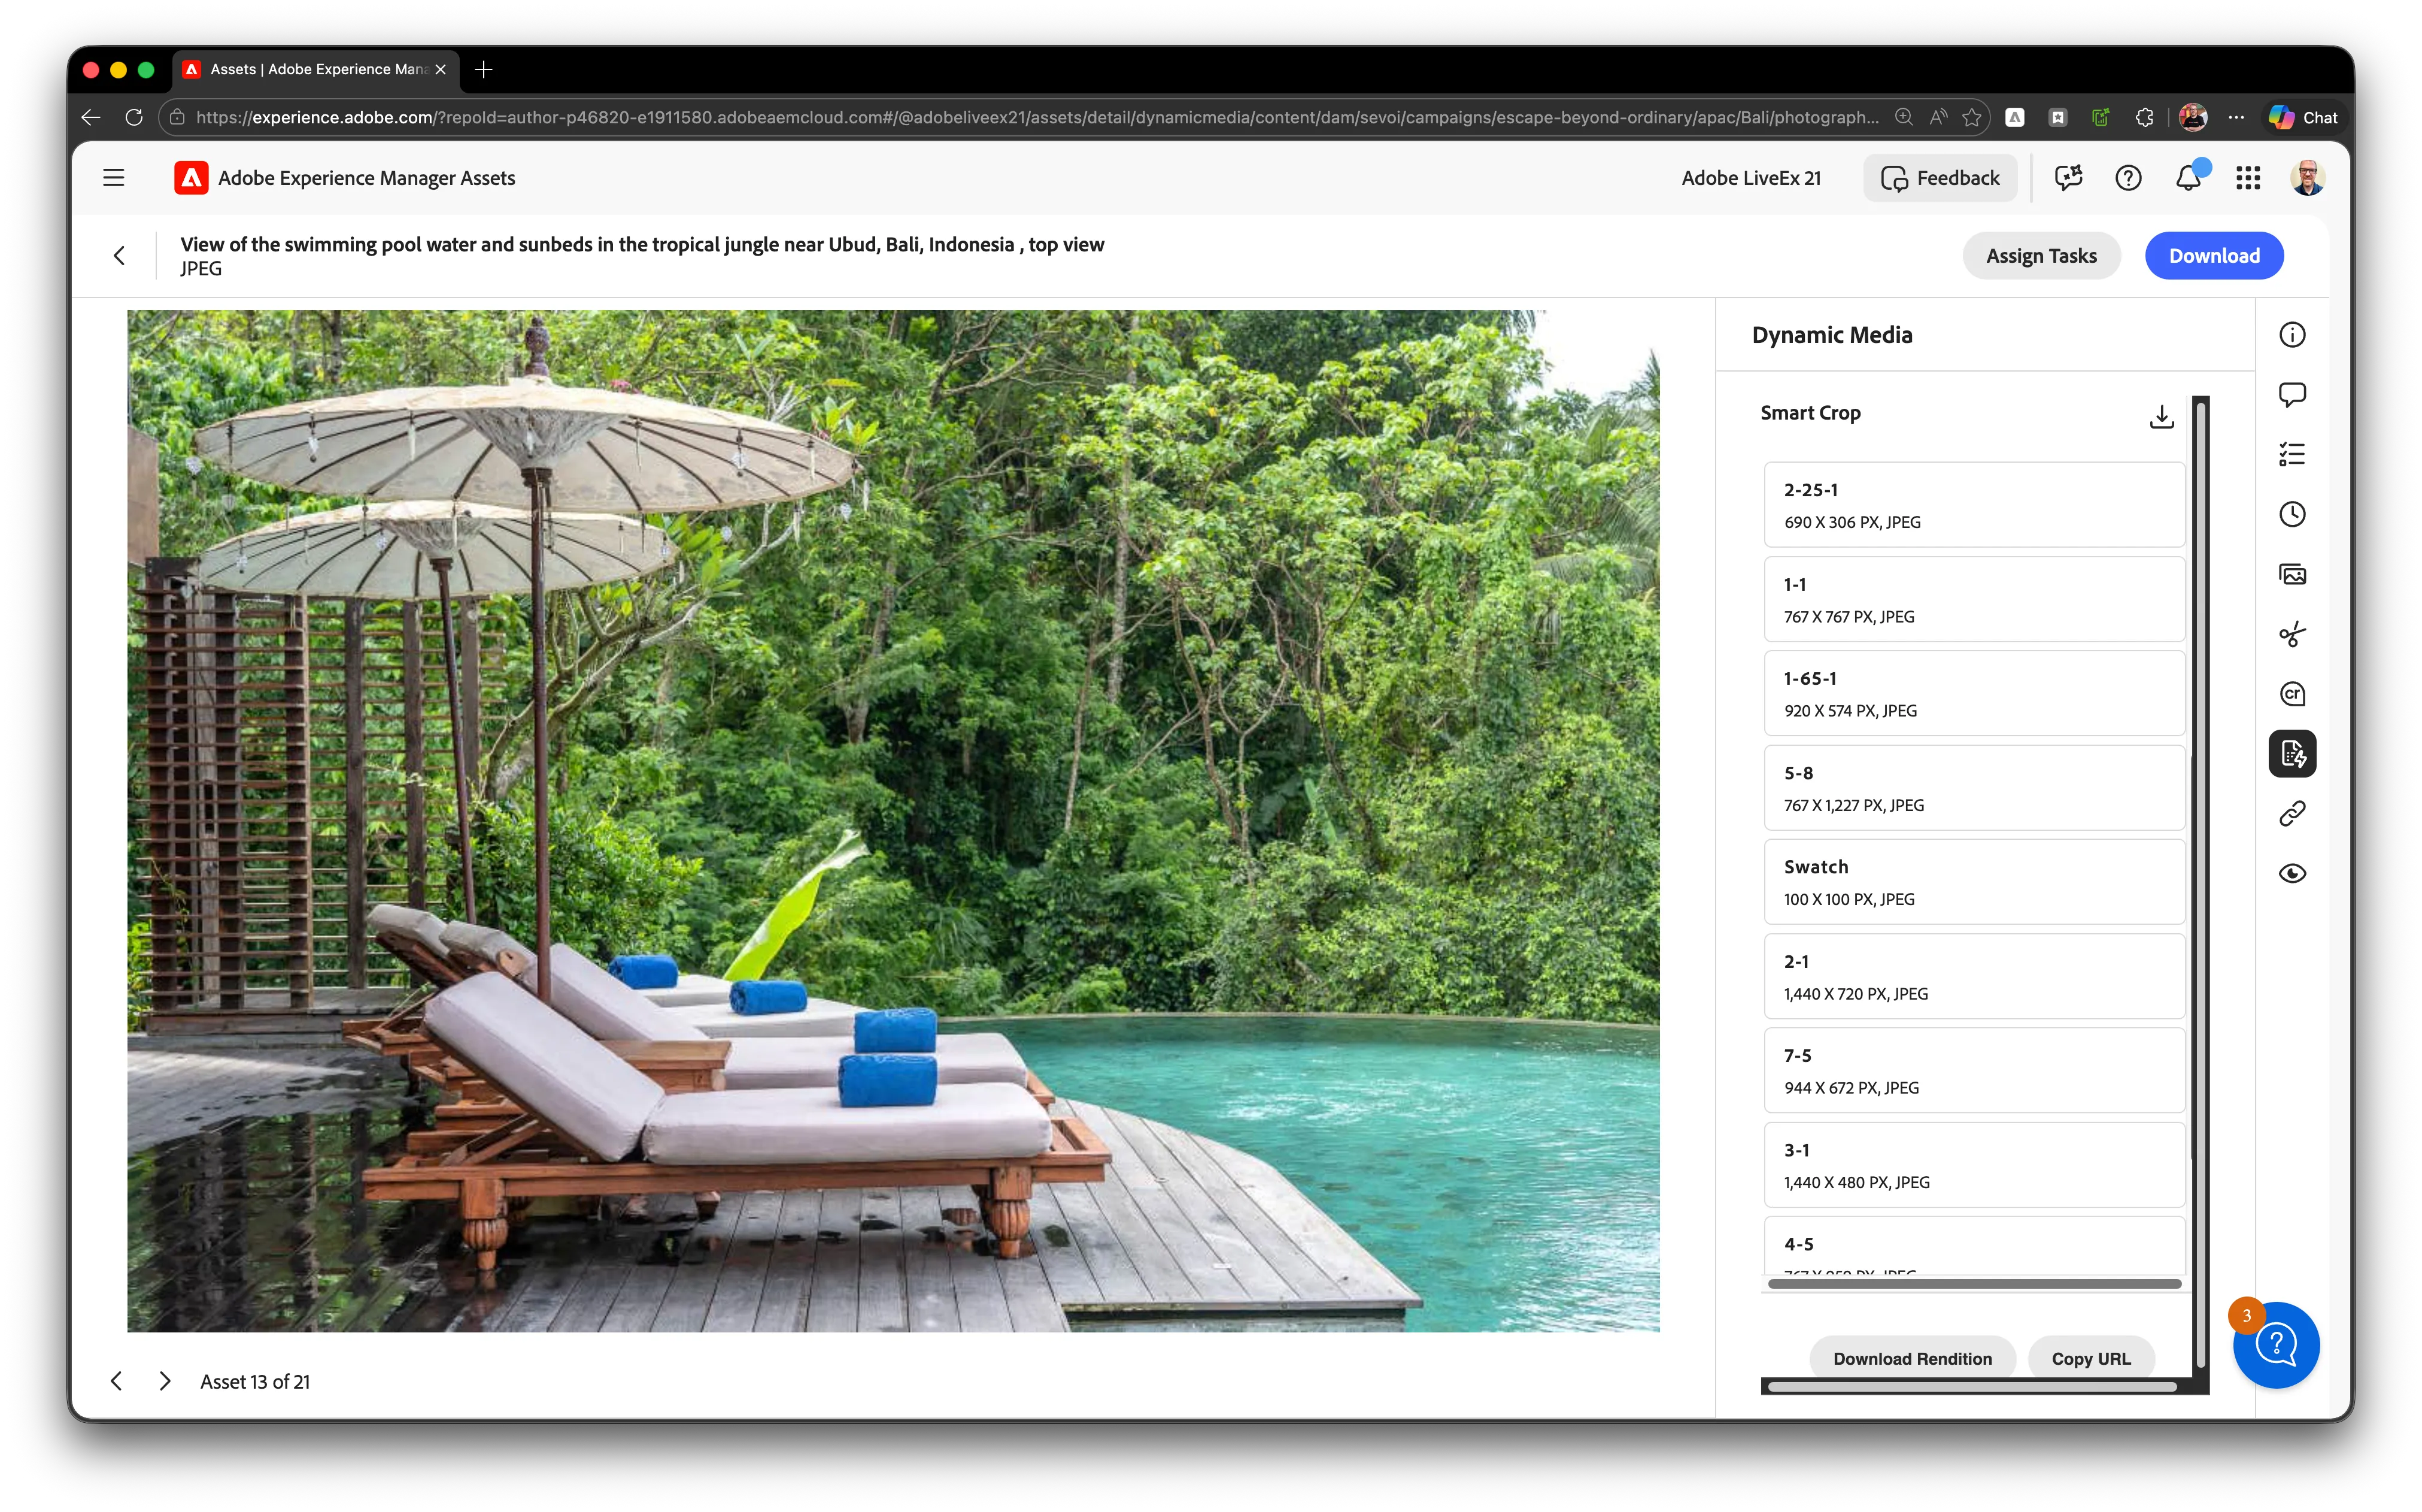
Beyond metadata and tagging, Smart Crop which is powered by Adobe Sensei via Dynamic Media identifies the focal point of each image and pre-generates renditions for common aspect ratios automatically. This means channel-ready variations are available without generating separate stored files for each format.
Value for Your Organization:
- AI-generated metadata provide broader taxonomy coverage for discovery and filtering
- Smart Crops eliminate repetitive production work for common channel formats
- Assets are immediately usable across channels without designer intervention
Reference Data: AI-Generated Metadata Fields
Field | Example Value | Where It Appears |
|---|---|---|
Generated Title | Tropical Sunset Pool | AI Generated tab in asset Properties |
Generated Description | Palm trees silhouetted against sunset reflecting in infinity pool at luxury resort | AI Generated tab in asset Properties |
Generated Keywords | Resort, Sunset, Palm, Pool, Tropical, Luxury, Travel, Vacation | AI Generated tab in asset Properties |
Smart Crop | 2:1 (banner), 1:1 (social square), 4:5 (portrait social), 5:8 (story) | Dynamic Media Smart Crop renditions |
Step-by-Step Instructions
Step 1: Select a Bali resort photography asset
- Navigate to the photography folder within the Bali campaign
- Click on one of the high-resolution resort images
- Select an image with strong visual elements (sunset, pool, architecture)
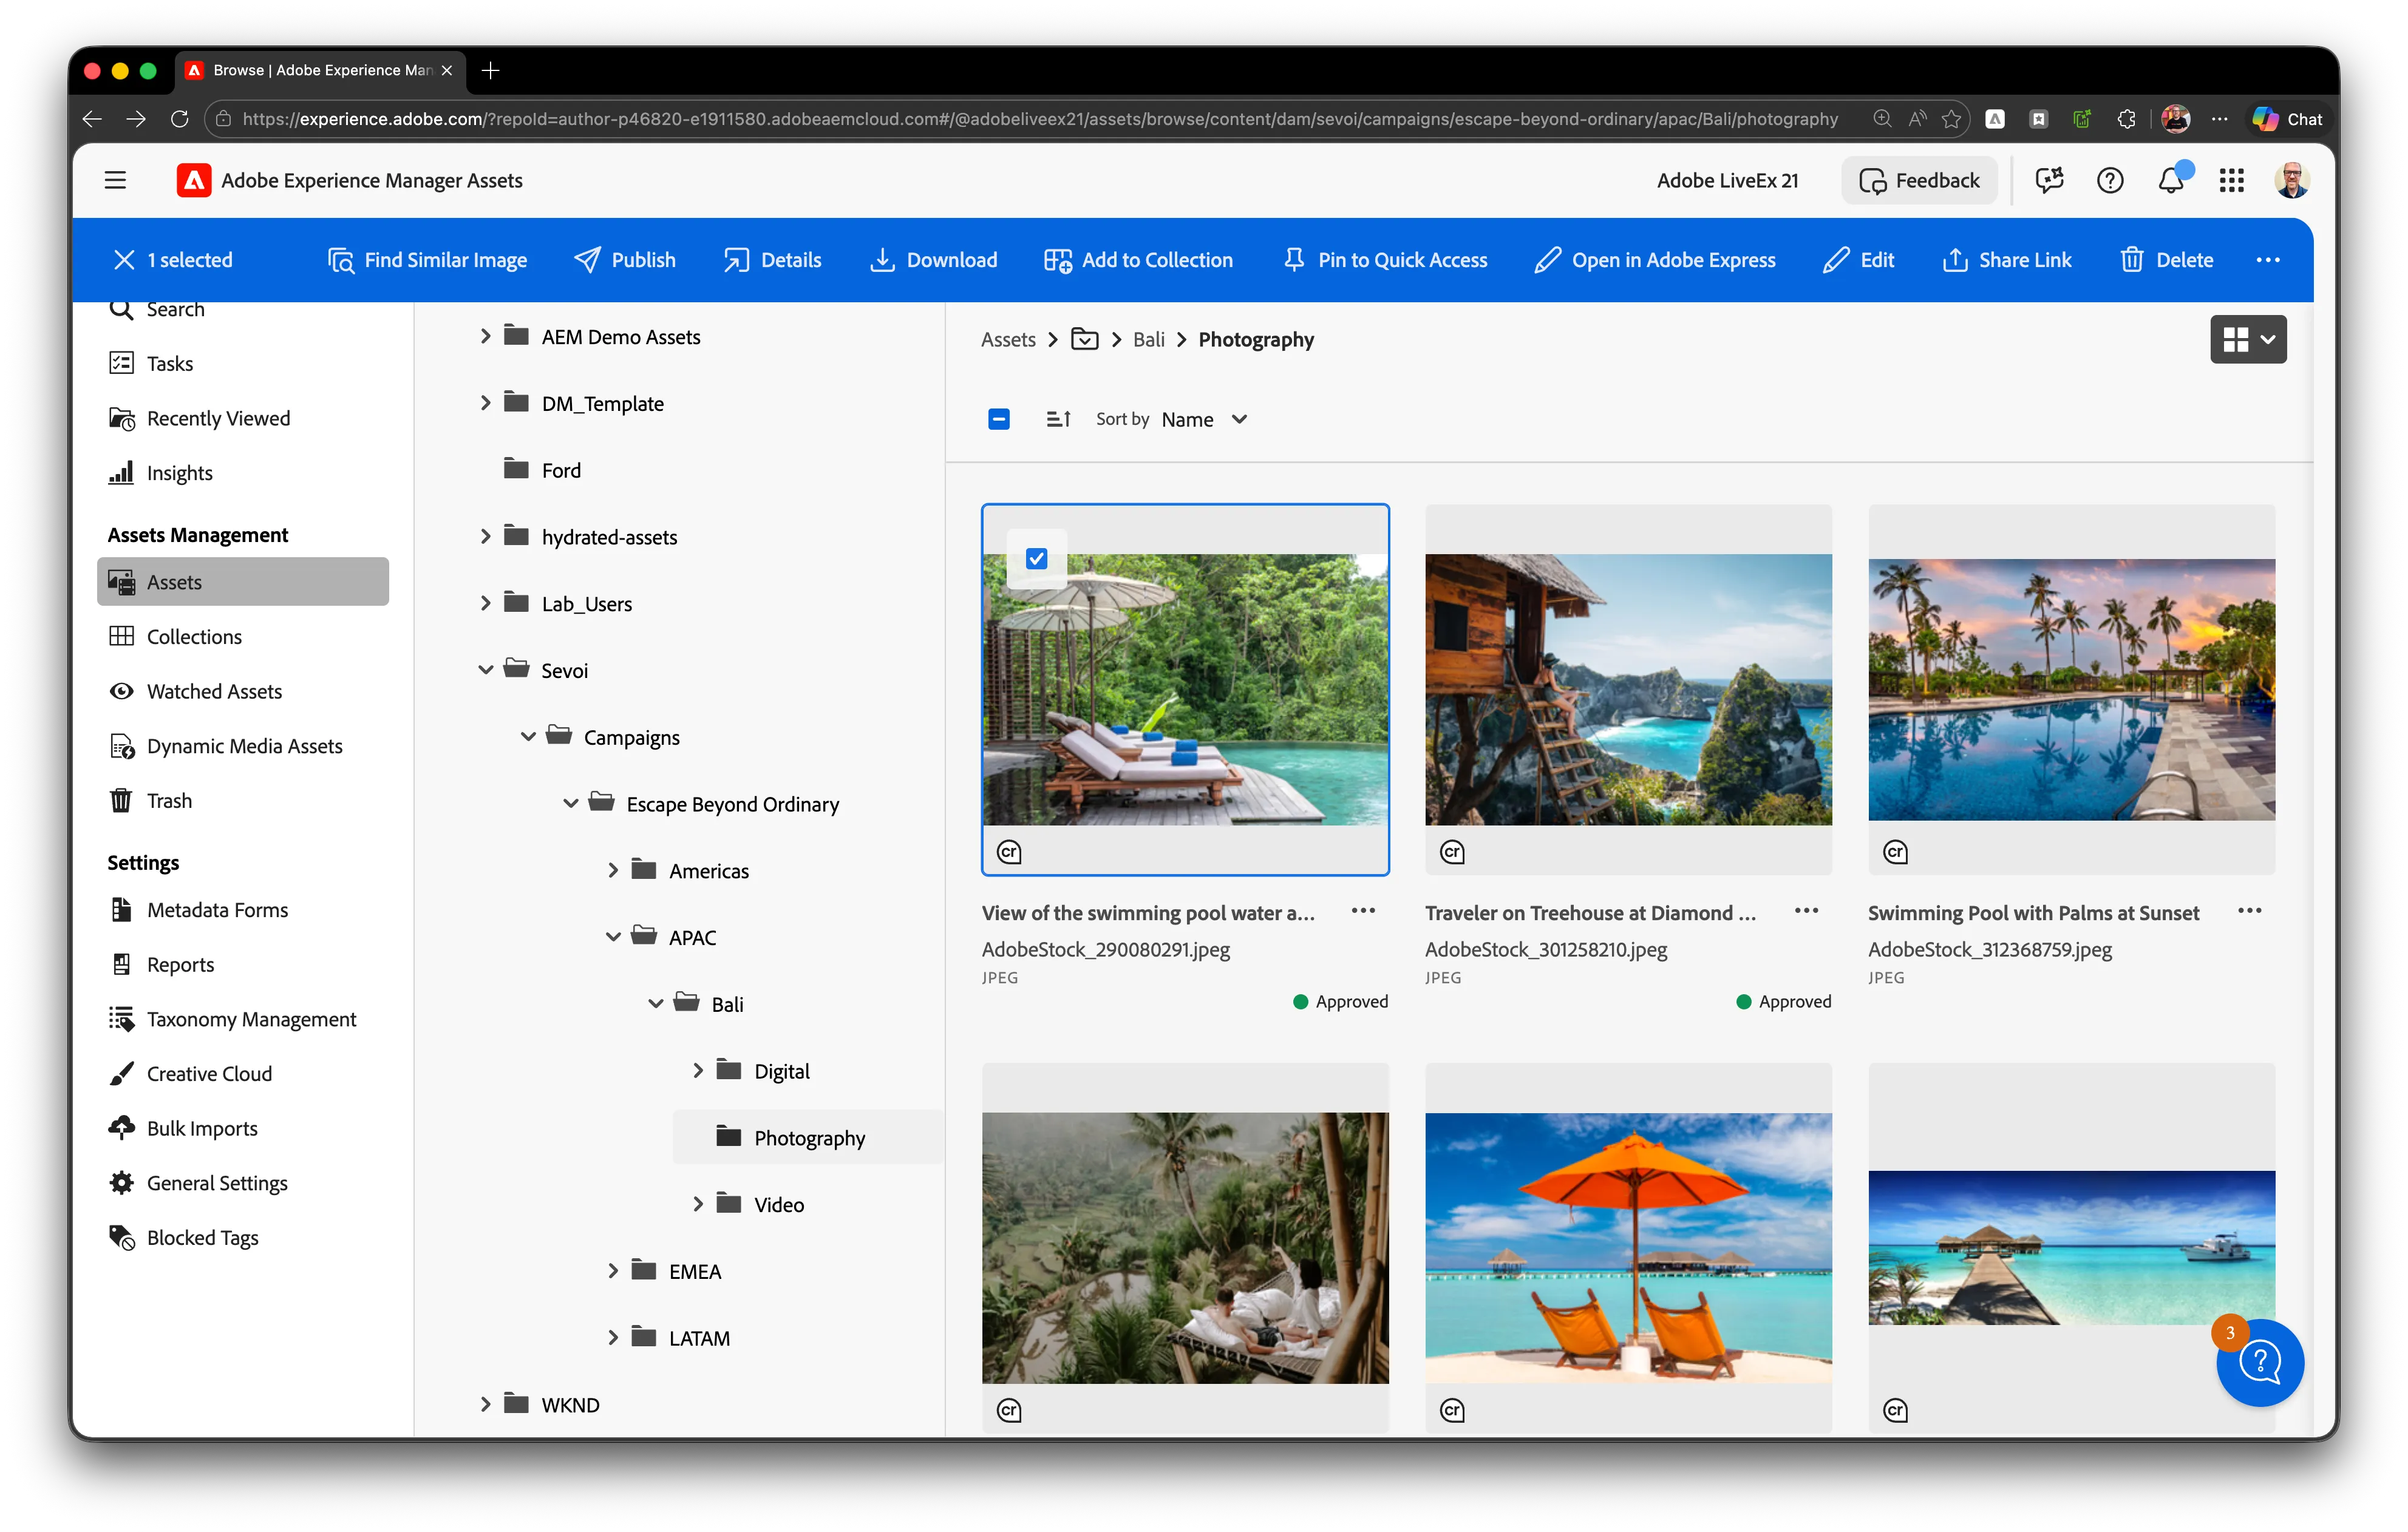
Step 2: Open the asset details panel
- With the asset selected, the details panel should appear in the top menubar
- This panel shows all metadata associated with the asset
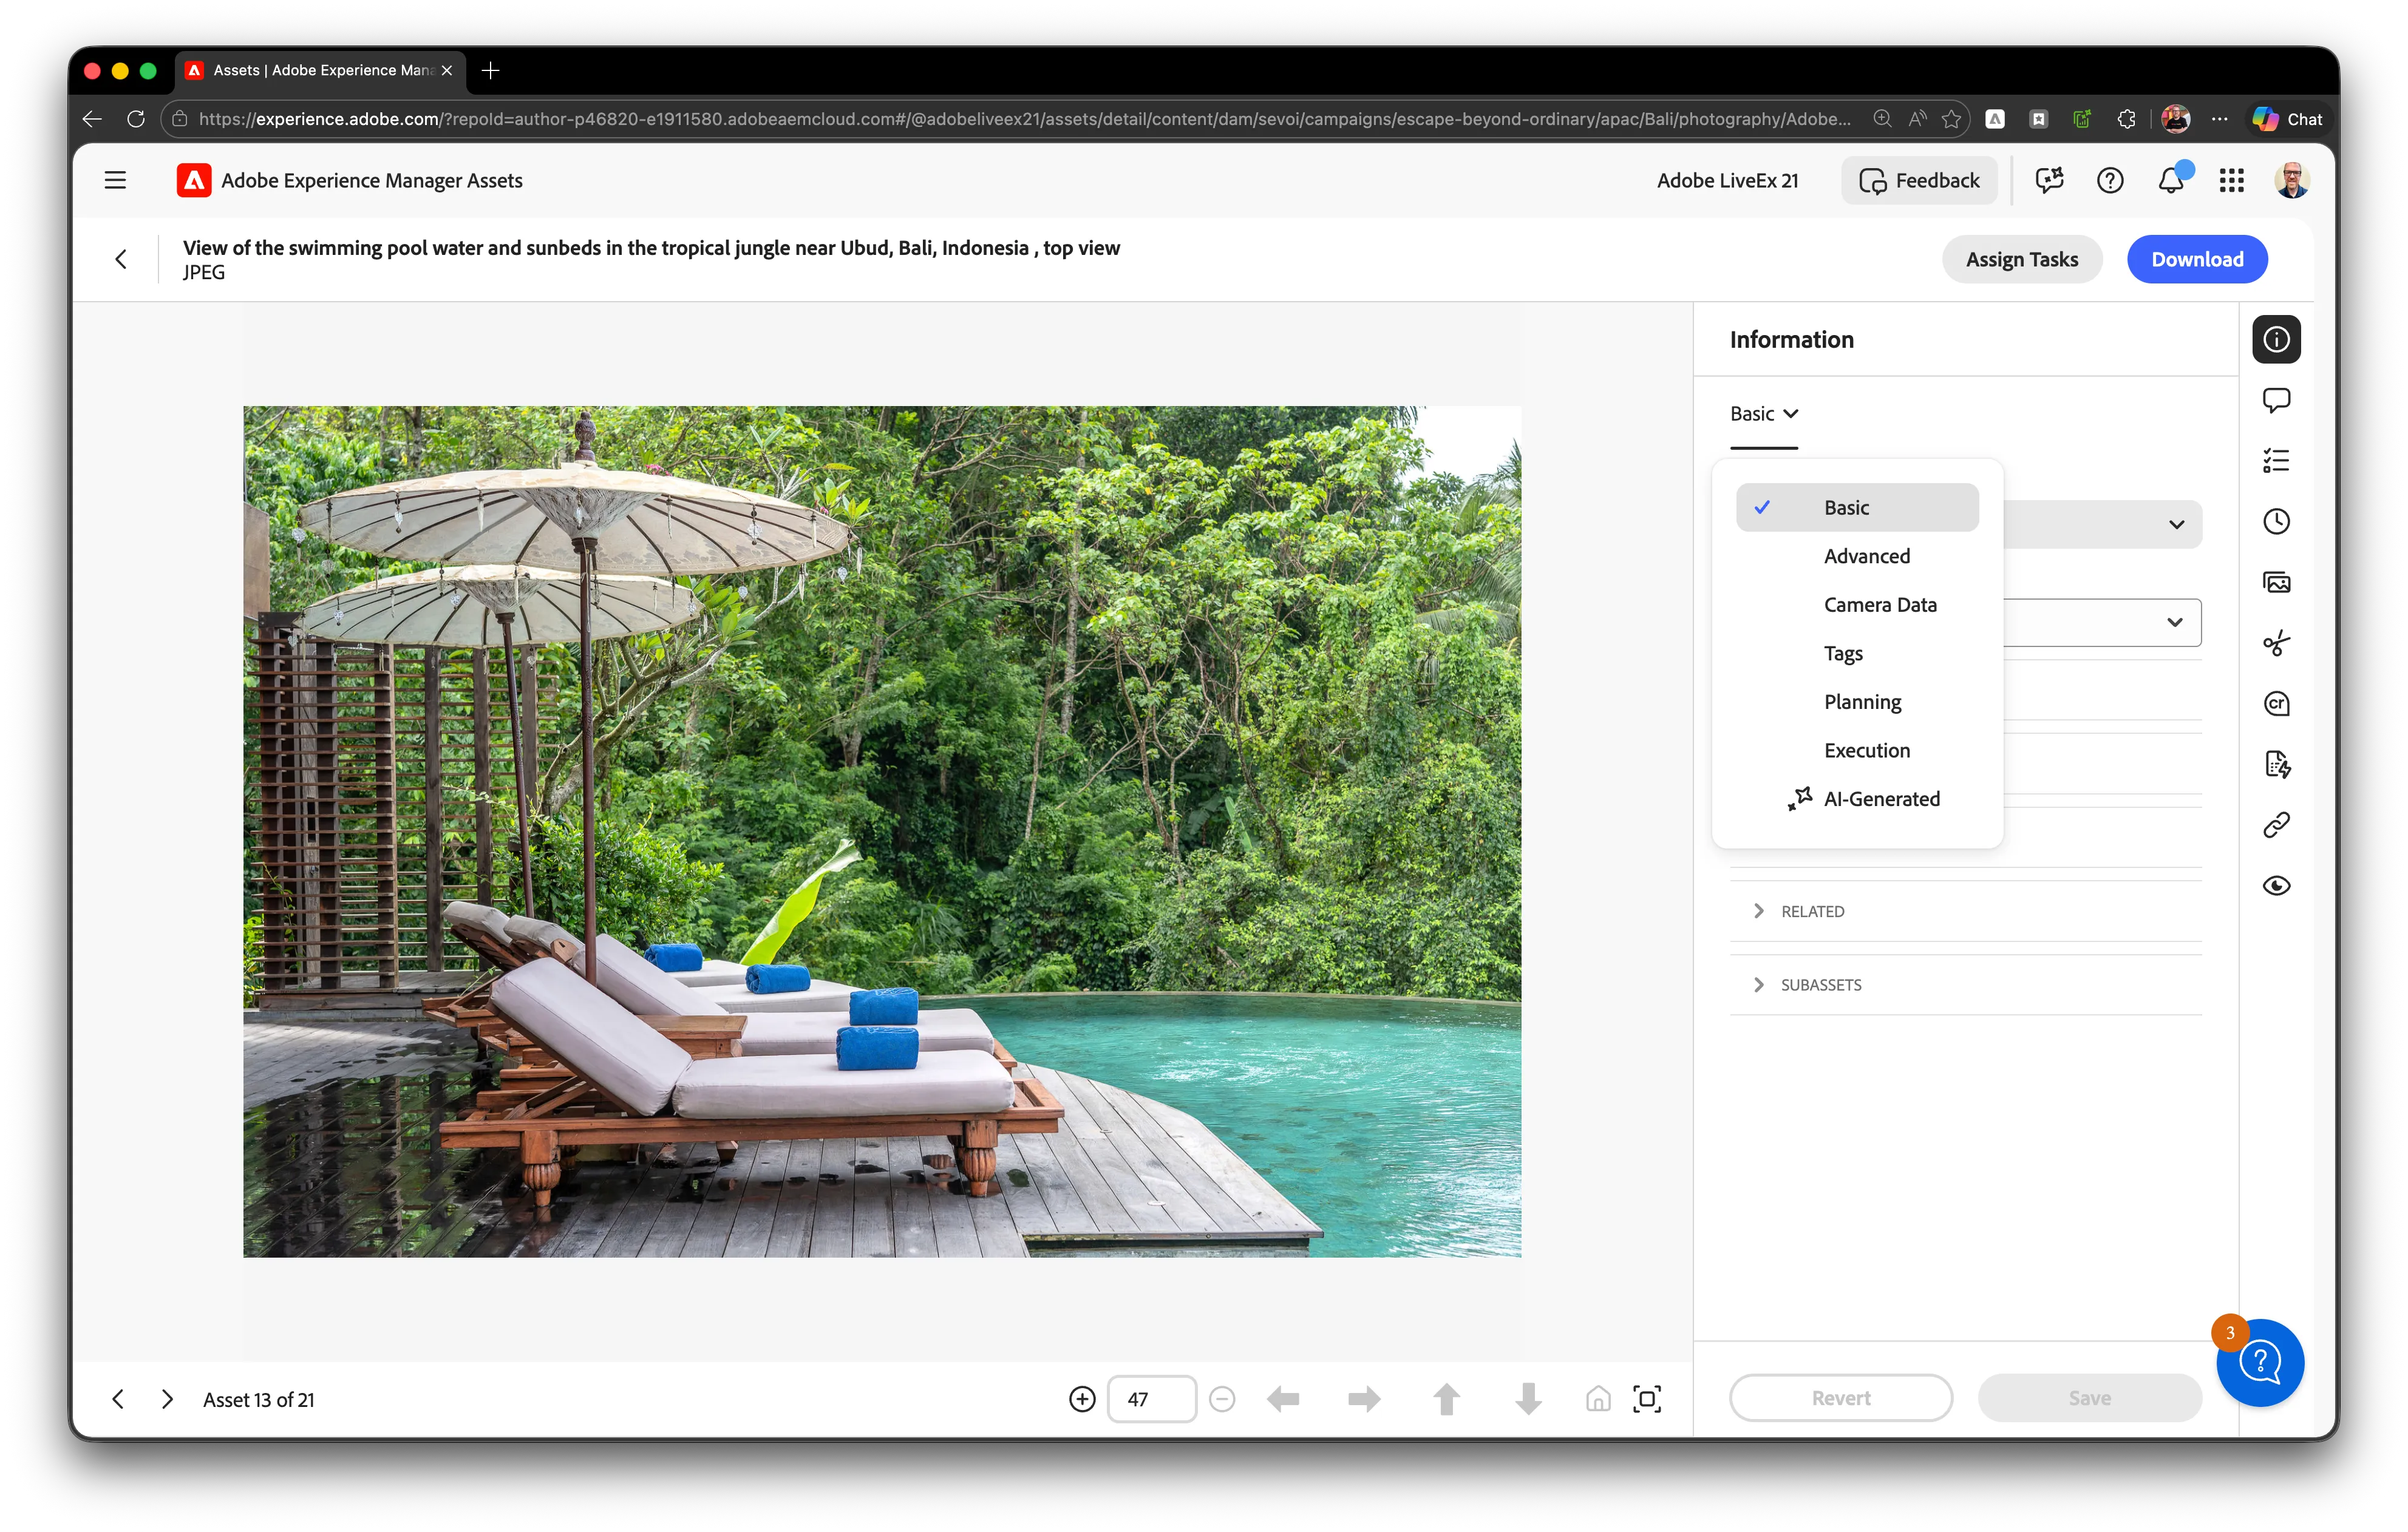
Step 3: Locate the AI Generated metadata tab
- In asset Properties, look for the AI Generated tab
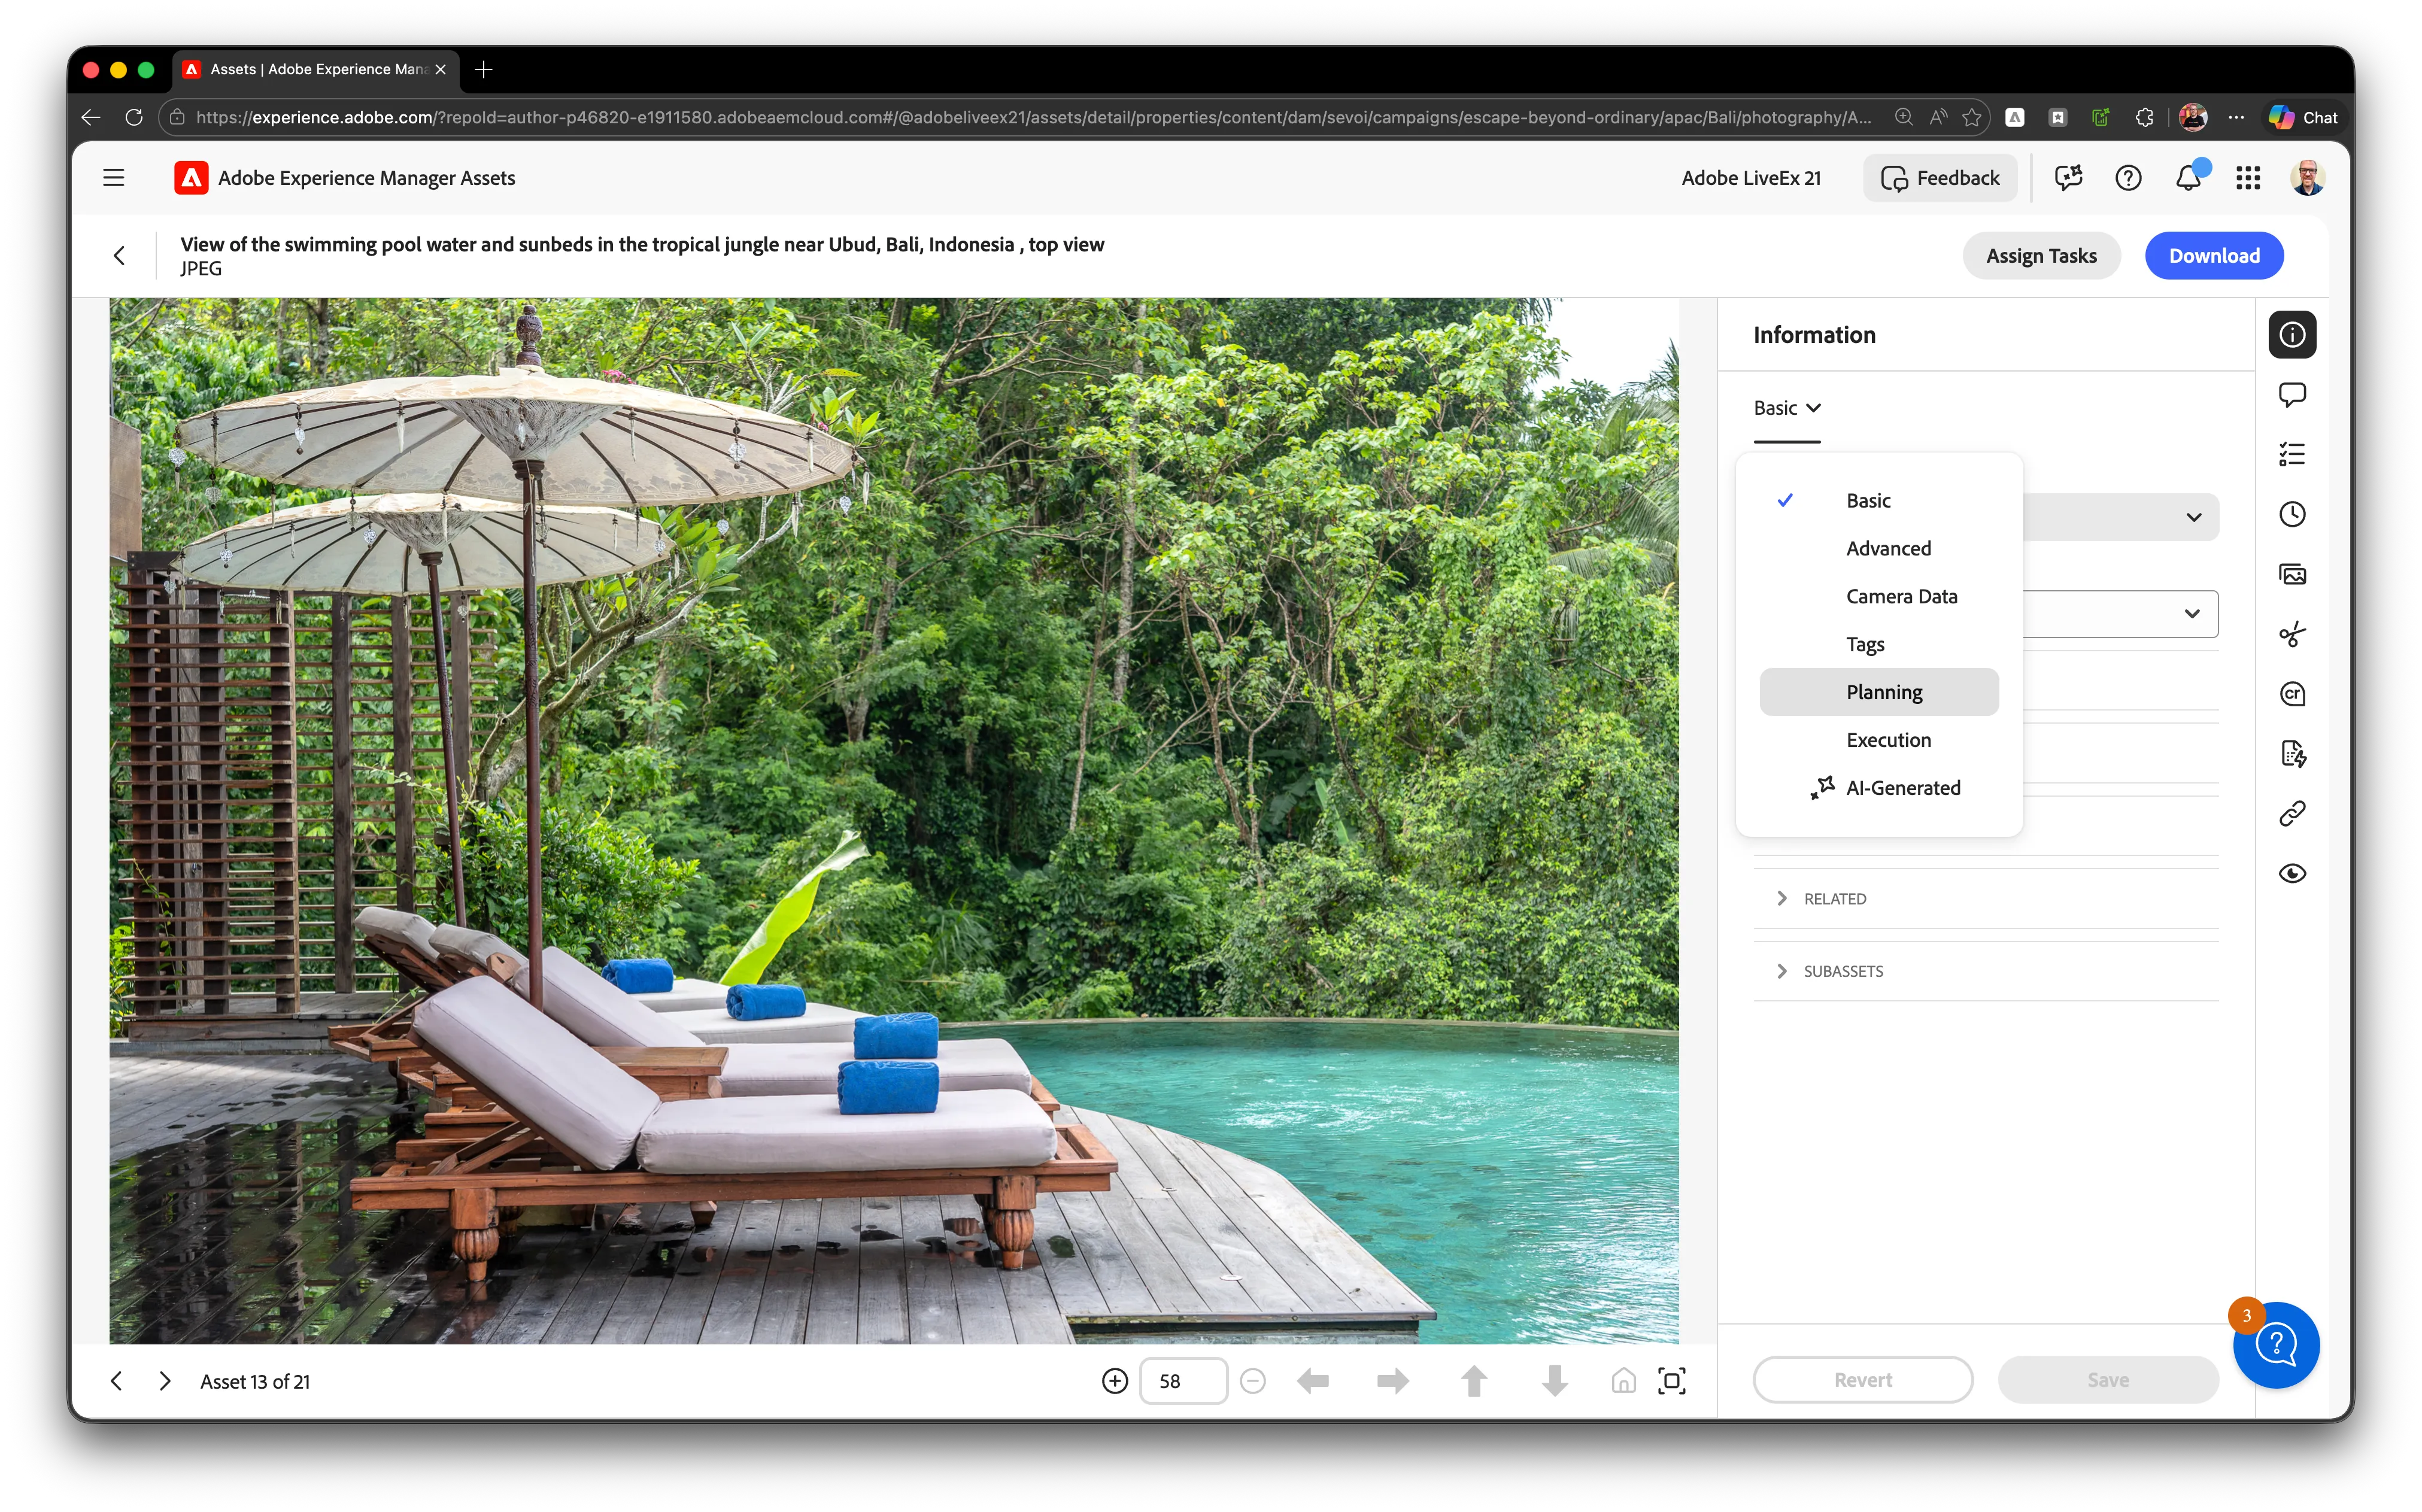
- This tab is separate from the Basic tab where manual metadata lives
- The fields here were populated automatically when the asset was uploaded
Step 4: Review the Generated Title and Generated Description
- Read the AI-generated title which should describe the core subject of the image clearly
- Review the description for scene accuracy and detail
Step 5: Examine the Generated Keywords
- Find the Generated Keywords field in the AI Generated tab
- Review the list of AI-generated terms representing the asset's main themes
- These keywords are indexed for search alongside Smart Tags
- You can add or modify keywords manually if any relevant terms are missing
Step 6: Click on the Smart Crops or Renditions section
- Locate the Renditions panel via the Dynamic Media icon in the right pane
- Look for the Smart Crop renditions within the list
Step 7: Preview each pre-generated Smart Crop
- Click through the available Smart Crop renditions:
- 2:1 for web banners
- 1:1 for social media squares
- 4:5 for portrait social (Instagram feed)
- 5:8 for Stories format
Step 8: Observe focal point consistency
- Compare how the main subject remains visible and centered across all crops
- Each crop maintains the visual impact of the original without manual intervention
- If needed, click Edit Smart Crop to adjust the focal point manually for any ratio
Exercise 1.3: Workfront Metadata Integration
Duration: 4 minutes
Understanding Workflow-Sourced Metadata
AI can tell us what is in an image, but it cannot tell us why it was created. That context comes from Workfront. When assets sync from the creative workflow via the native AEM-Workfront integration, they bring campaign metadata, brand information, regional targeting, and launch dates. This combination of AI-generated and workflow-sourced metadata creates a complete picture that powers governance, reporting, and downstream activation.
Value for Your Organization:
- Campaign context enables reporting and ROI measurement
- Launch dates support content lifecycle management and expiration
- Single source of truth from Workfront eliminates data silos
Reference Data: Enriched Metadata from Workfront
Field | Value | Source |
|---|---|---|
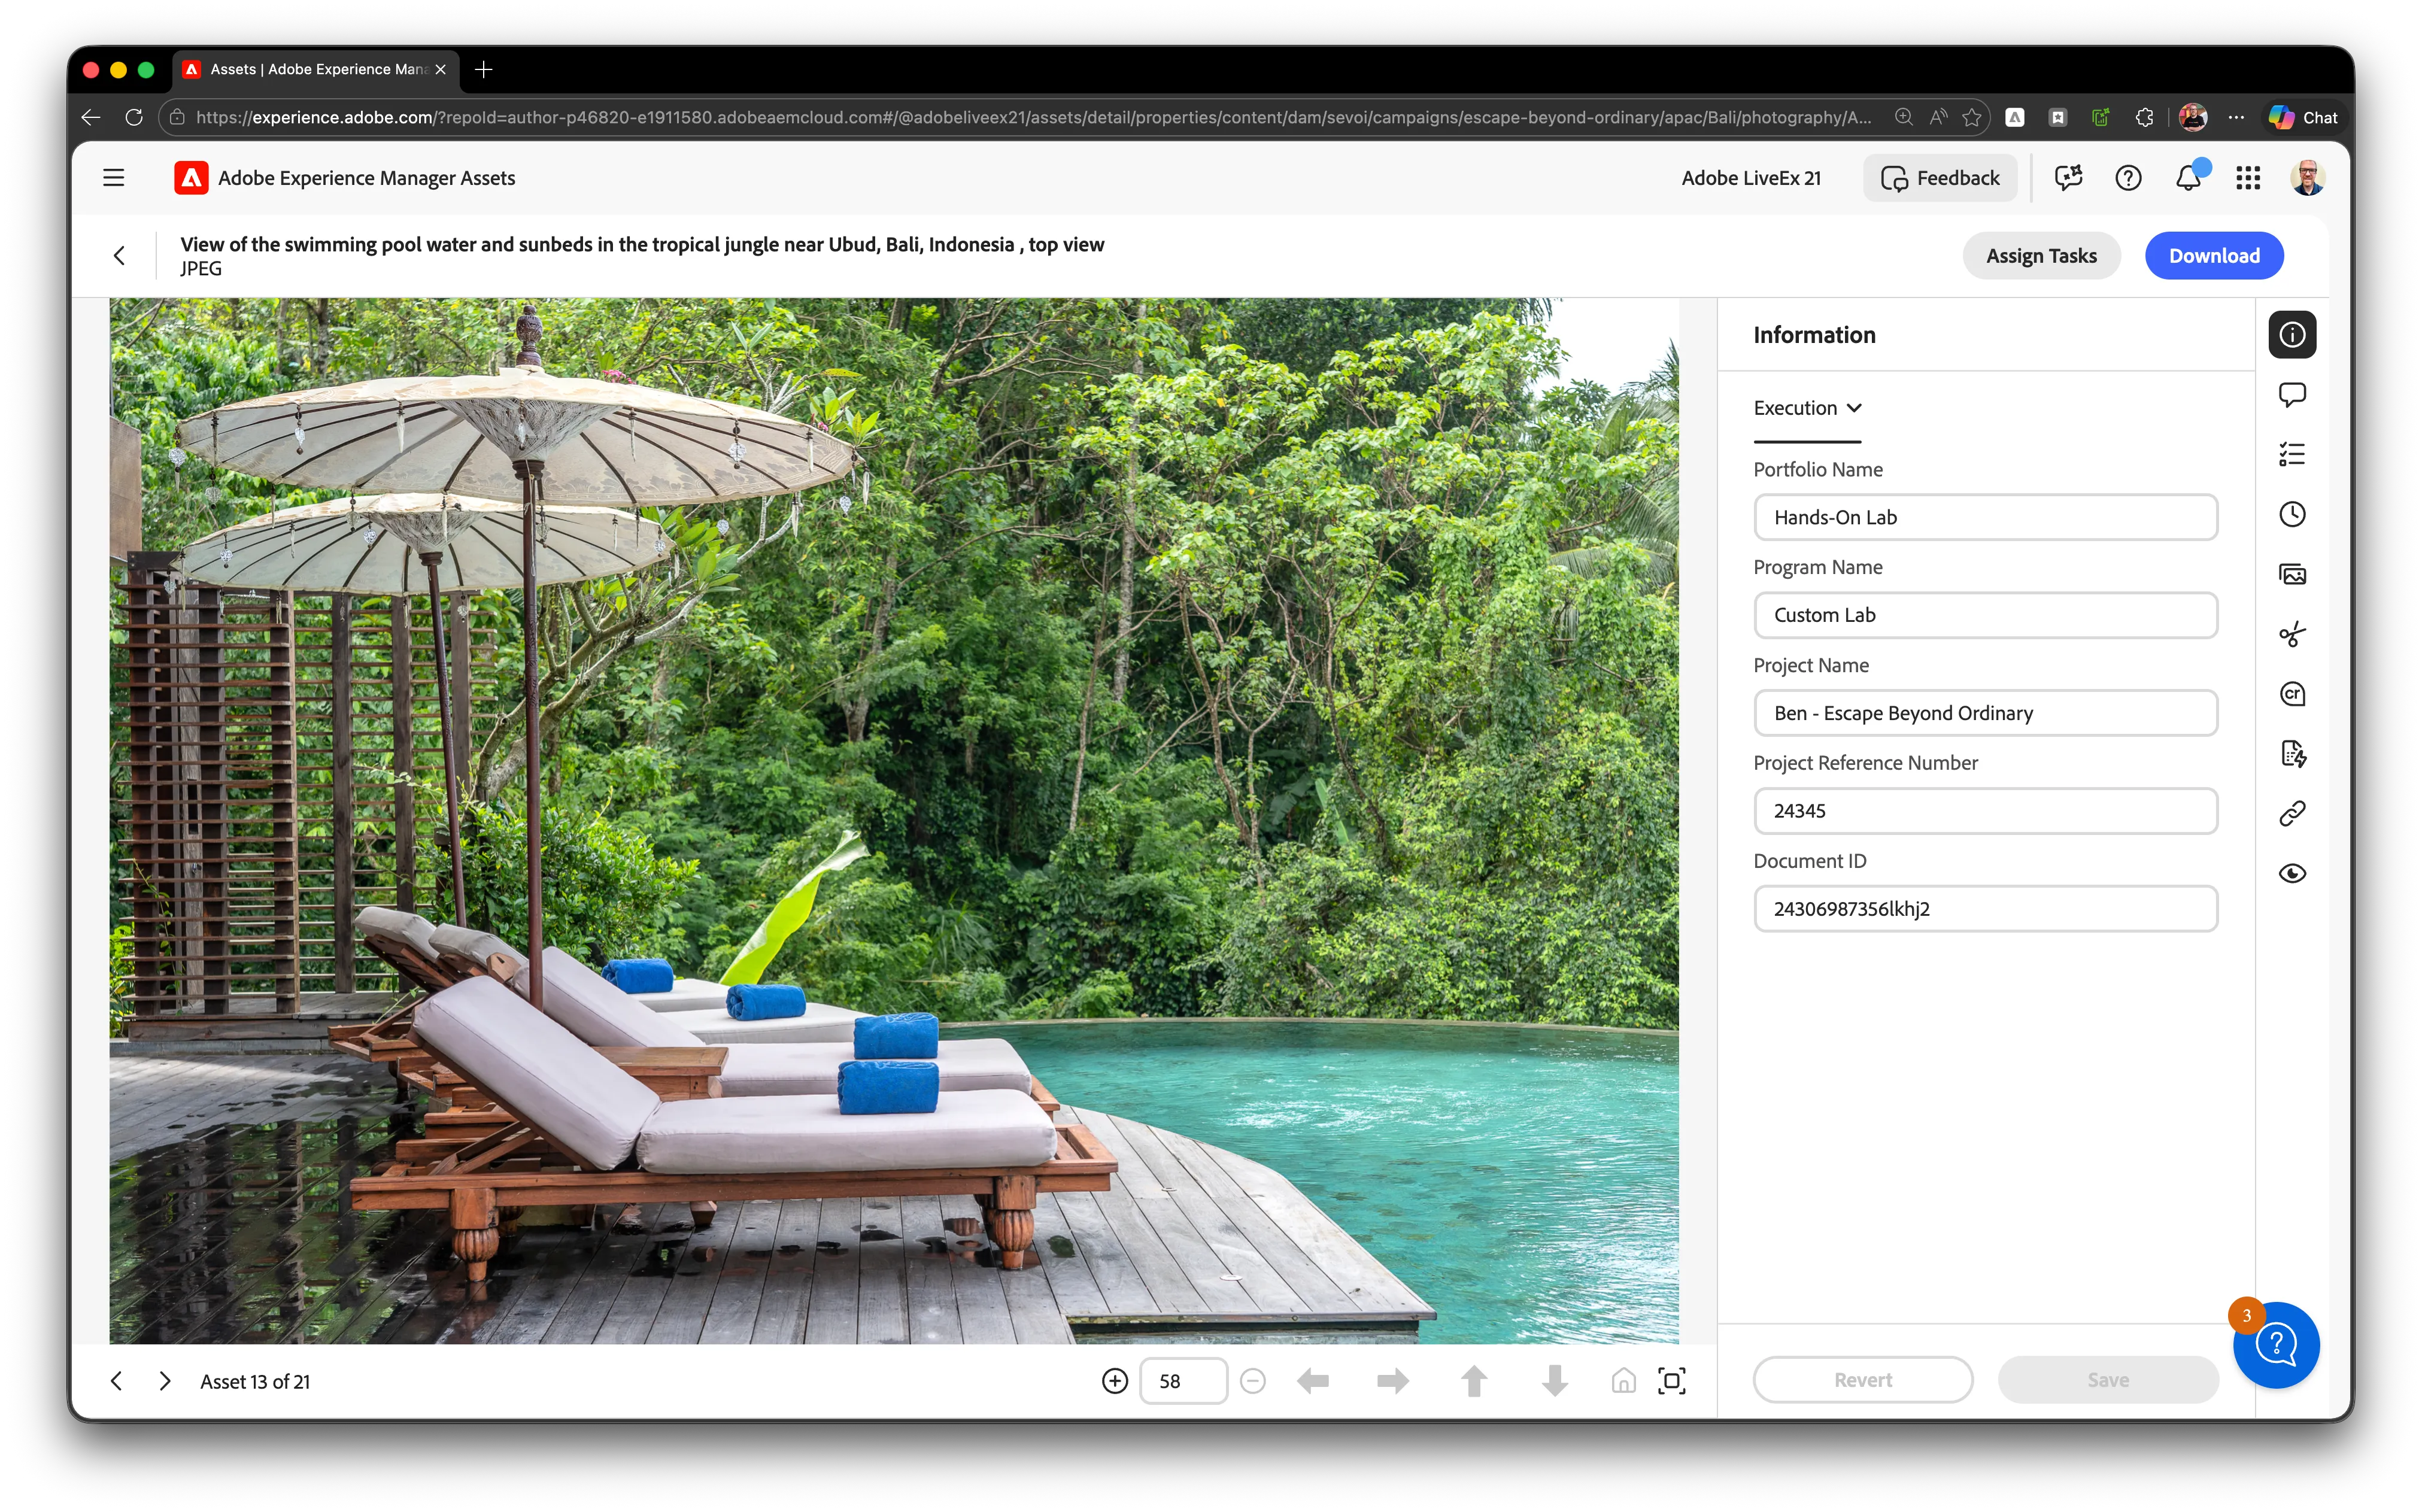
Portfolio Name | Hands-On Lab | Workfront Project |
Program Name | Customer Lab | Workfront Project |
Project Name | Ben - Escape Beyond Ordinary | Workfront Project |
Project Reference Number | 24345 | Workfront Project |
Campaign | Escape Beyond Ordinary | Workfront Planning |
Brand | Sevoi | Workfront Planning |
Launch Date | April 14, 2026 | Workfront Planning |
End Date | October 14, 2026 | Workfront Planning |
Step-by-Step Instructions
Step 1: Keep the asset details panel open
- With your previously selected asset still active
- Click on the Info button in the right sidebar
- Open the Tab for Planning
Step 2: Review the Campaign Planning fields
- Locate the Campaign field showing "Escape Beyond Ordinary"
- This metadata came automatically from the Workfront workflow
- Review the Brand field showing "Sevoi"
- Review the campaign activation timing fields
Step 3: Compare AI-Generated and Planning/Execution fields
- Scroll between the AI Generated tab and the Workfront-sourced fields
- Note how AI tells you "what" (sunset, pool, tropical)
- Note how Workfront tells you "why" (campaign, audience, timing)
- Together they create complete asset context
Exercise 1.4: AI Search Capabilities
Duration: 5 minutes
Understanding Intelligent Asset Discovery
AEM Assets provides multiple AI-powered search modes. Omnisearch (the standard search bar) factors Smart Tags and AI-generated metadata fields into results alongside standard metadata. Contextual Search allows users to type natural language text prompts and AEM automatically converts them into search filters. Search results that match all terms in metadata fields display first, followed by results that match terms in Smart Tags only.
Value for Your Organization:
- Contextual Search converts natural language prompts into search filters automatically
- Global teams can search in their own language and terminology
- Semantic search surfaces relevant content even without exact keyword matches
Reference Data: AI Search Capabilities
Capability | Example | How It Works |
|---|---|---|
Synonym Understanding | Search "ocean" finds assets tagged "beach," "sea," "coastline" | Conceptual matching via Smart Tags and generated metadata |
Misspelling Tolerance | "trupical" returns "tropical" assets | Fuzzy matching in Omnisearch index |
Multilingual Search | Spanish/German query finds English-tagged assets | Natural language processing via Contextual Search |
Natural Language | "pool umbrellas for summer social media" | Contextual Search converts prompt to filters |
Step-by-Step Instructions
Step 1: Click on the search bar in AEM Assets
- Locate the search bar at the top of the Assets view
- Click to activate the search field
- AI Search is enabled by default
Step 2: Search for Poolside Umbrella
- Type: poolside umbrella
- Press Enter to execute the search
Step 3: Observe synonym matching results
- Review the search results that appear
- Notice assets related to pools, patio umbrellas, and outdoor lounging scenes
- AI understood "poolside umbrella" includes related concepts via Smart Tags and generated metadata
Step 4: Clear search and try a misspelling
- Clear the search field
- Type: trupical paradise (intentional misspelling)
- Press Enter to search
- Observe that results still show tropical/paradise content
Step 5: Try a natural language search using Contextual Search
- Clear the search field
- Type: pool umbrellas for summer social media
- Press Enter and review results
Step 6: Search in another language (Spanish)
- Clear the search field
- Type: sombrilla de piscina (Spanish for "pool umbrella")
- Press Enter and observe results
Step 7: Try German search
- Clear the search field
- Type: Poolschirm (German for "pool umbrella")
- Verify results show luxury resort content tagged in English
Exercise 1.5: Collections for Internal Team Collaboration
Duration: 3 minutes
Understanding Collections in AEM Assets
Collections allow teams to organize and share curated sets of assets without moving files or disrupting folder governance. Unlike folders, a collection can include assets from different locations across the DAM. AEM supports three types: Lightbox (a personal, per-user collection), Standard Collections (manually curated and shareable), and Smart Collections (dynamically populated based on saved search criteria).
Value for Your Organization:
- Standard Collections can be shared with configurable view or edit permissions
- Smart Collections automatically surface the latest assets matching defined criteria
- Collections work across folder boundaries, enabling cross-campaign curation
Reference Data: Collection Types
Collection Type | Behavior | Best Use Case |
|---|---|---|
Standard Collection | Manually curated, static, shareable | One-time project deliverables, curated asset sets |
Smart Collection | Dynamic, auto-updates based on saved search query | Ongoing campaigns, approved regional asset pools |
Step-by-Step Instructions
Step 1: Navigate to the Collections view
- In AEM Assets, locate the Collections option in the left navigation
- Click to open the Collections interface
- You will see existing collections organized by Standard and Smart Collection types
Step 2: Create a new Smart Collection
- Click the Create Collection button
- Select Smart Collection as the collection type
- Name it: APAC Campaign Approved Assets
Step 3: Add filter criteria
- In the smart collection configuration, apply the following filters:
- Brand = Sevoi
- Region = APAC
- Status = Approved
- These criteria will dynamically include all matching assets from across the repository
Step 4: Save the collection
- Click Save to create the Smart Collection
- The collection will immediately populate with matching assets
- Note the count of assets included
Step 5: View the collection contents
- Click on your newly created collection
- Review all assets that match the criteria
- Note how assets from different folders appear together in one view
Step 6: Observe cross-folder aggregation
- Notice assets from both photography and banners folders appearing together
- Users do not need to know folder structure to find the right assets
Step 7: Test dynamic updating
- Navigate back to an asset folder
- Approve an additional APAC asset (if not already approved)
Step 8: Refresh the collection
- Return to your Smart Collection and refresh
- Verify the newly approved asset automatically appears
Exercise 1.6: Asset Approval for Distribution
Duration: 3 minutes
Understanding Approval Status as Governance
Not all assets in the repository are ready for broad distribution. In AEM Assets as a Cloud Service, each asset can be assigned one of three review states via the Status dropdown in the Basic tab of asset Properties: Approved, Rejected, or No Status (the default). When setting an asset to Approved, an Approval Target field appears, allowing you to direct the asset to Content Hub, Delivery (Dynamic Media with OpenAPI), or both, depending on your environment.
Value for Your Organization:
- Precise governance over which assets reach external distribution channels
- Approval Target field directs assets to the correct downstream channel
- Visual indicators make approval status immediately clear
Reference Data: Approval Status
Status | Purpose | Access Level |
|---|---|---|
Approved | Finalized, ready for distribution | Content Hub users + AEM Assets users (per Approval Target) |
Rejected | Flagged as non-compliant or off-brand | AEM Assets internal users only |
No Status | Work in progress or awaiting review (default) | AEM Assets internal users only |
Step-by-Step Instructions
Step 1: Select a Bali resort photography asset
- Navigate to the campaign photography folder
- Select one of the high-quality resort images
- Choose an image you consider campaign-ready
Step 2: Open the asset properties panel
- With the asset selected, access the properties/details panel
- Navigate to the Basic tab
Step 3: Locate the Status field
- Scroll through the Basic tab to find the Status dropdown
- Note the current state (No Status by default)
- This field controls distribution eligibility
Step 4: Change status to Approved
- Click on the Status dropdown
- Select "Approved" from the options (Approved, Rejected, No Status)
- If the Approval Target field appears, select Content Hub, Delivery, or both based on your environment
Step 5: Save the properties
- Click Save or Apply to commit the change
- Wait for confirmation that the change was saved
- The asset is now approved for distribution to the selected target
Step 6: Note the visual indicator
- Observe the visual badge showing approved status on the asset card
- This makes status immediately visible when browsing
- Other users can quickly identify approved assets
Step 7: Select 2-3 additional campaign assets
- Hold Ctrl/Cmd and click to select multiple assets
- Choose assets that are campaign-ready
Step 8: Bulk approve the selected assets
- With multiple assets selected, access the Bulk Metadata Edit panel
- Change the Status field to "Approved" for all selected
- Save to apply the change to all assets simultaneously